Hammer throw is a sport that uses balance, strength, and projection. Apart from the physical strength that is required, participants also have to have excellent footwork. It has been a sport at the Olympics since 1900 and, in 1995, women were allowed to start participating too. This has become a popular sport and the aim is for the athlete to throw the hammer as far as they can. Below we are going to take a closer look at the history and rules of this sport.
A History of Hammer Throw
Hammer throwing can be traced back to the 18th century to a time when Tailteann people used to show off their strength in front of kings by throwing heavy stones that were attached to a rope. This was eventually transformed into a sport that would eventually be added to the Olympic games. There are quite a few people who believe that this sport actually originated from the Scottish Independence war. Edward I was king at the time and he banned the use of traditional weapons. Therefore, to get around the ban, the warriors in the armies used heavy rocks tied to rope and swung them at high speed towards their opponents.
The Countries That Participate
The hammer throw is a track and field event. Since it was first introduced to the Olympic Games at the beginning of the 20th century, the sport has increased a lot in popularity. Asians are particularly fond of this sport and Asian countries that now take this sport seriously includes the likes of China, India, Tajikistan, Kuwait, Uzbekistan, and South Korea. Non-Asian countries that like this sport includes the likes of Great Britain, Norway, Russia, USA, and the Czech Republic.
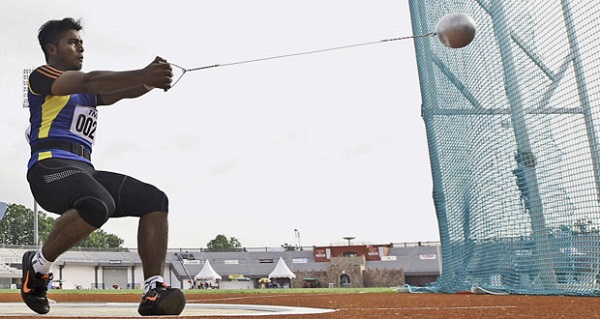
A Look at the Rules of This Sport
There are a number of rules that hammer throw athletes have to abide by. We are going to list them for you below:
- Before the athlete starts swinging, they are allowed to have the hammer head outside or inside the circle
- If the hammer touches the ground when the athlete is swinging, then it will be called a foul throw
- If the hammer breaks while in the air, it will not be considered as a foul so long as the athlete has not broken any other rules or regulations
- An athlete, on average, spins around about 34 times before releasing the hammer, but there is no rule that stipulates how many times an athlete has to spin before letting go of the hammer
- When the athlete finally lets go of the hammer, they have to stay inside the circle. If they step out of it, then it will be a foul throw and the distance will not be measured

Hammer Throw Safety Measures
This might look like a simple sport, but there are many safety measures that have to be put in place to ensure that nobody gets seriously injured. Below we have listed some of the important safety measures that need to be followed:
- When an athlete is throwing the hammer, all officials and retrievers are instructed not to turn their backs on the action
- When the retrievers have brought the hammer back to the athletic area, they are instructed to walk backwards or sideways
- Officials and judges should always stand at the back of the net
- Participants should inspect the throwing area before participating because the ground can become very slippery when wet
- There should be no foreign objects in the circle and before a throw takes place the athlete should make sure that there is nobody in the landing area